No Bake Oreo Icebox Cake
|
Getting your Trinity Audio player ready...
|
Summer in our household often feels like a beautiful, chaotic whirlwind. My husband, Mateo, spends long hours in his professional kitchen, while I manage the schedules of our two daughters, Sofia and Mia. On those sweltering July afternoons, the last thing I want to do is turn on the oven.
We believe food is love, and nothing says love like a cool, creamy treat that brings the whole family together. Last week, the girls and I decided to surprise Mateo with his favorite childhood dessert. We whipped up a No Bake Oreo Icebox Cake, and the joy on his face reminded me why these simple moments matter.
This dessert captures the essence of a stress-free summer evening. It combines the crunch of chocolate cookies with the velvet smoothness of fresh whipped cream. You do not need professional chef skills to master this No Bake Oreo Icebox Cake.
Even my fifteen-year-old Mia can assemble it perfectly. As the layers sit in the fridge, the cookies transform into a cake-like texture that melts in your mouth. We often sit on the back porch, sharing slices of this No Bake Oreo Icebox Cake while the sun sets.
It is a tradition that honors our belief in nourishing our souls with sweetness and simplicity. If you want a dessert that requires zero baking time but offers maximum flavor, this No Bake Oreo Icebox Cake is your ultimate solution. Let us dive into the magic of this effortless classic.
Why You’ll Love This No Bake Oreo Icebox Cake Recipe
You will absolutely adore this No Bake Oreo Icebox Cake because it respects your time and your palate. First, the preparation takes less than twenty minutes. In a busy world, finding a dessert that looks elegant but requires minimal effort is a true win.
Second, the No Bake Oreo Icebox Cake uses only a handful of wholesome ingredients. Mateo always tells me that high-quality cream makes the biggest difference, and he is right. Third, this recipe is incredibly versatile.
You can serve it at a backyard barbecue, a birthday party, or a quiet Sunday dinner. Furthermore, children love helping with the assembly process. Sofia and Mia enjoy stacking the cookies and spreading the cream, making it a wonderful family bonding activity.
The No Bake Oreo Icebox Cake also tastes better the longer it sits. You can make it a day in advance, which reduces stress when you host guests. Additionally, the texture of a No Bake Oreo Icebox Cake is uniquely satisfying.
It strikes a perfect balance between light, airy cream and softened chocolate biscuits. Most importantly, it satisfies that deep chocolate craving without being overly heavy. You will find yourself returning to this No Bake Oreo Icebox Cake recipe every time the temperature rises.
Ingredients You’ll Need
Before you begin, gather these simple items from your pantry and fridge. We prefer using organic heavy cream for the best flavor profile. Mateo insists that cold ingredients result in a more stable whip. Ensure your cookies are fresh and crunchy before they meet the cream in your No Bake Oreo Icebox Cake.
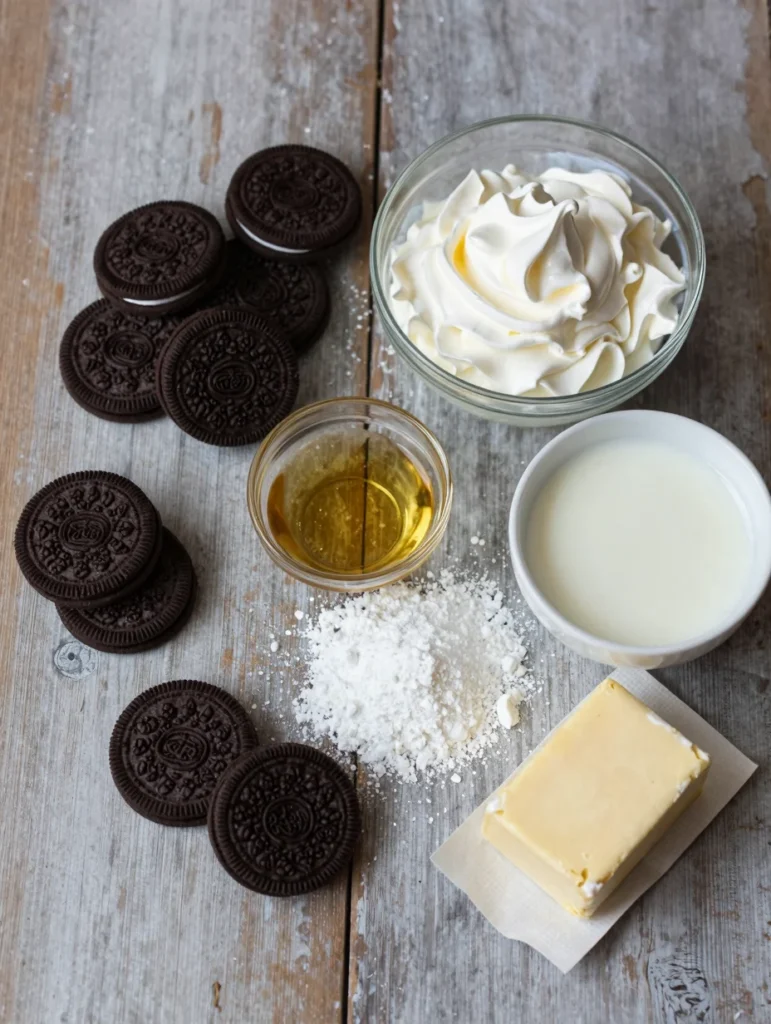
| Ingredient | Quantity | Notes |
|---|---|---|
| Oreo Cookies | 3 Standard Packs (approx. 45-50 cookies) | Regular or Double Stuf work well |
| Heavy Whipping Cream | 3 Cups | Keep very cold until use |
| Powdered Sugar | 1/2 Cup | Adjust for your preferred sweetness |
| Vanilla Extract | 2 Teaspoons | Pure vanilla provides the best aroma |
| Whole Milk | 1/2 Cup | For lightly dipping the cookies |
| Chocolate Shavings | Optional Garnish | Adds a professional touch |
Substitutions & Variations
While the classic No Bake Oreo Icebox Cake is perfection, you can easily customize it. If you have a gluten sensitivity, simply swap the standard cookies for gluten-free chocolate sandwich cookies. The No Bake Oreo Icebox Cake will still maintain its incredible structure.
For a dairy-free version, use cold coconut cream instead of heavy whipping cream. You must chill the coconut milk cans overnight to separate the thick cream from the liquid. If you want to experiment with flavors, try Mint Oreos or Peanut Butter Oreos.
Each variation brings a new dimension to your No Bake Oreo Icebox Cake. Mateo sometimes likes to add a layer of sliced strawberries or bananas between the cookies. This adds a fresh, fruity element that complements the rich chocolate.
Additionally, you can swap vanilla extract for almond extract or even a splash of peppermint. If you prefer a less sweet dessert, reduce the powdered sugar in the whipped cream. The cookies already provide a significant amount of sugar for the No Bake Oreo Icebox Cake.
Some people also enjoy adding a layer of chocolate ganache on top for an extra decadent finish. Whatever path you choose, the core technique of the No Bake Oreo Icebox Cake remains the same.
While the classic No Bake Oreo Icebox Cake is perfection, you can easily customize it. For more delicious no-bake options, check out No Bake Cheesecake Bars.
Step-by-Step Instructions
Follow these clear steps to create your masterpiece. Remember, patience is the secret ingredient for a successful No Bake Oreo Icebox Cake.
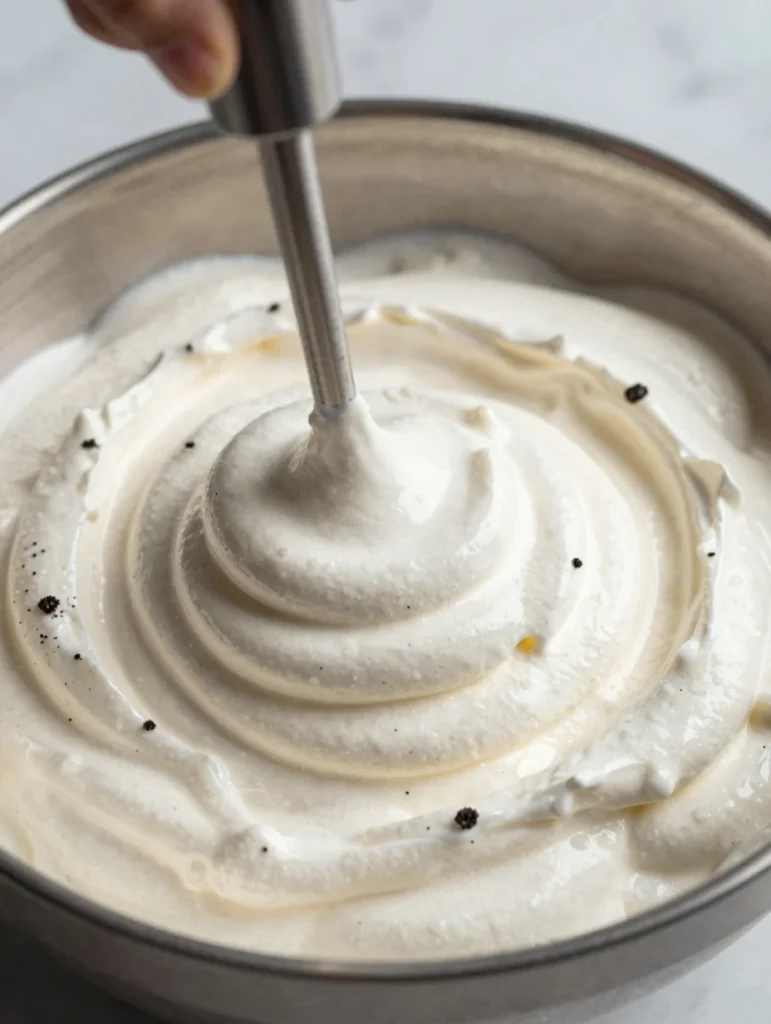
First, prepare your equipment. Use a large glass bowl or a metal bowl for whipping the cream. Mateo recommends placing the bowl in the freezer for ten minutes beforehand.
This keeps the cream cold and helps it fluff up quickly. Pour the cold heavy whipping cream into the chilled bowl. Add the vanilla extract and the powdered sugar.
Use a hand mixer or a stand mixer to beat the cream on medium-high speed. Continue until stiff peaks form. Be careful not to over-beat the cream, or it will turn into butter. You want a cloud-like consistency for your No Bake Oreo Icebox Cake.
Next, prepare your assembly dish. A 9×13 inch baking pan or a springform pan works beautifully. Pour a small amount of milk into a shallow bowl.
Take an Oreo cookie and dip it very quickly into the milk. Do not soak it, or the cookie will crumble too fast. Place the dipped cookie at the bottom of your pan.
Repeat this process until you have a single, even layer of cookies covering the base. This foundation is crucial for the No Bake Oreo Icebox Cake.
Then, spread about one-third of the whipped cream over the first cookie layer. Use an offset spatula to smooth the cream into every corner. Add another layer of milk-dipped cookies on top of the cream.
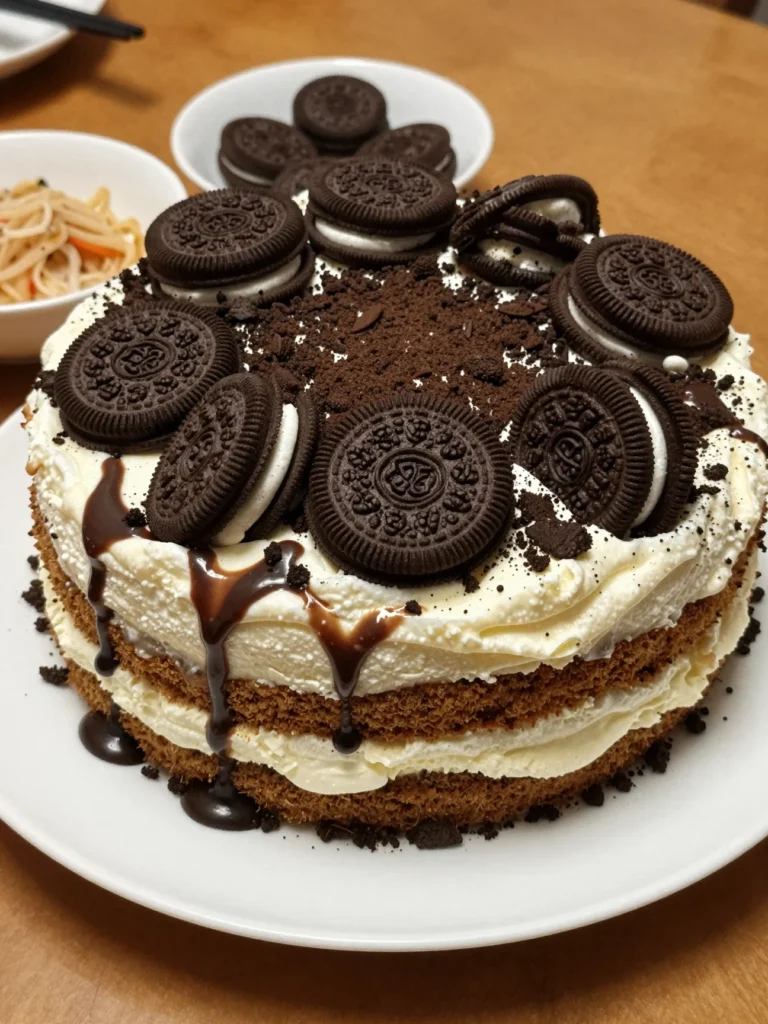
Press them down gently to remove any air pockets. Repeat the layering process until you use all your cookies and cream. Usually, three layers of cookies provide the best height for a No Bake Oreo Icebox Cake. Finish with a thick, smooth layer of whipped cream on top.
Finally, cover the pan tightly with plastic wrap. Place the No Bake Oreo Icebox Cake in the refrigerator. You must let it chill for at least six hours, though overnight is much better.
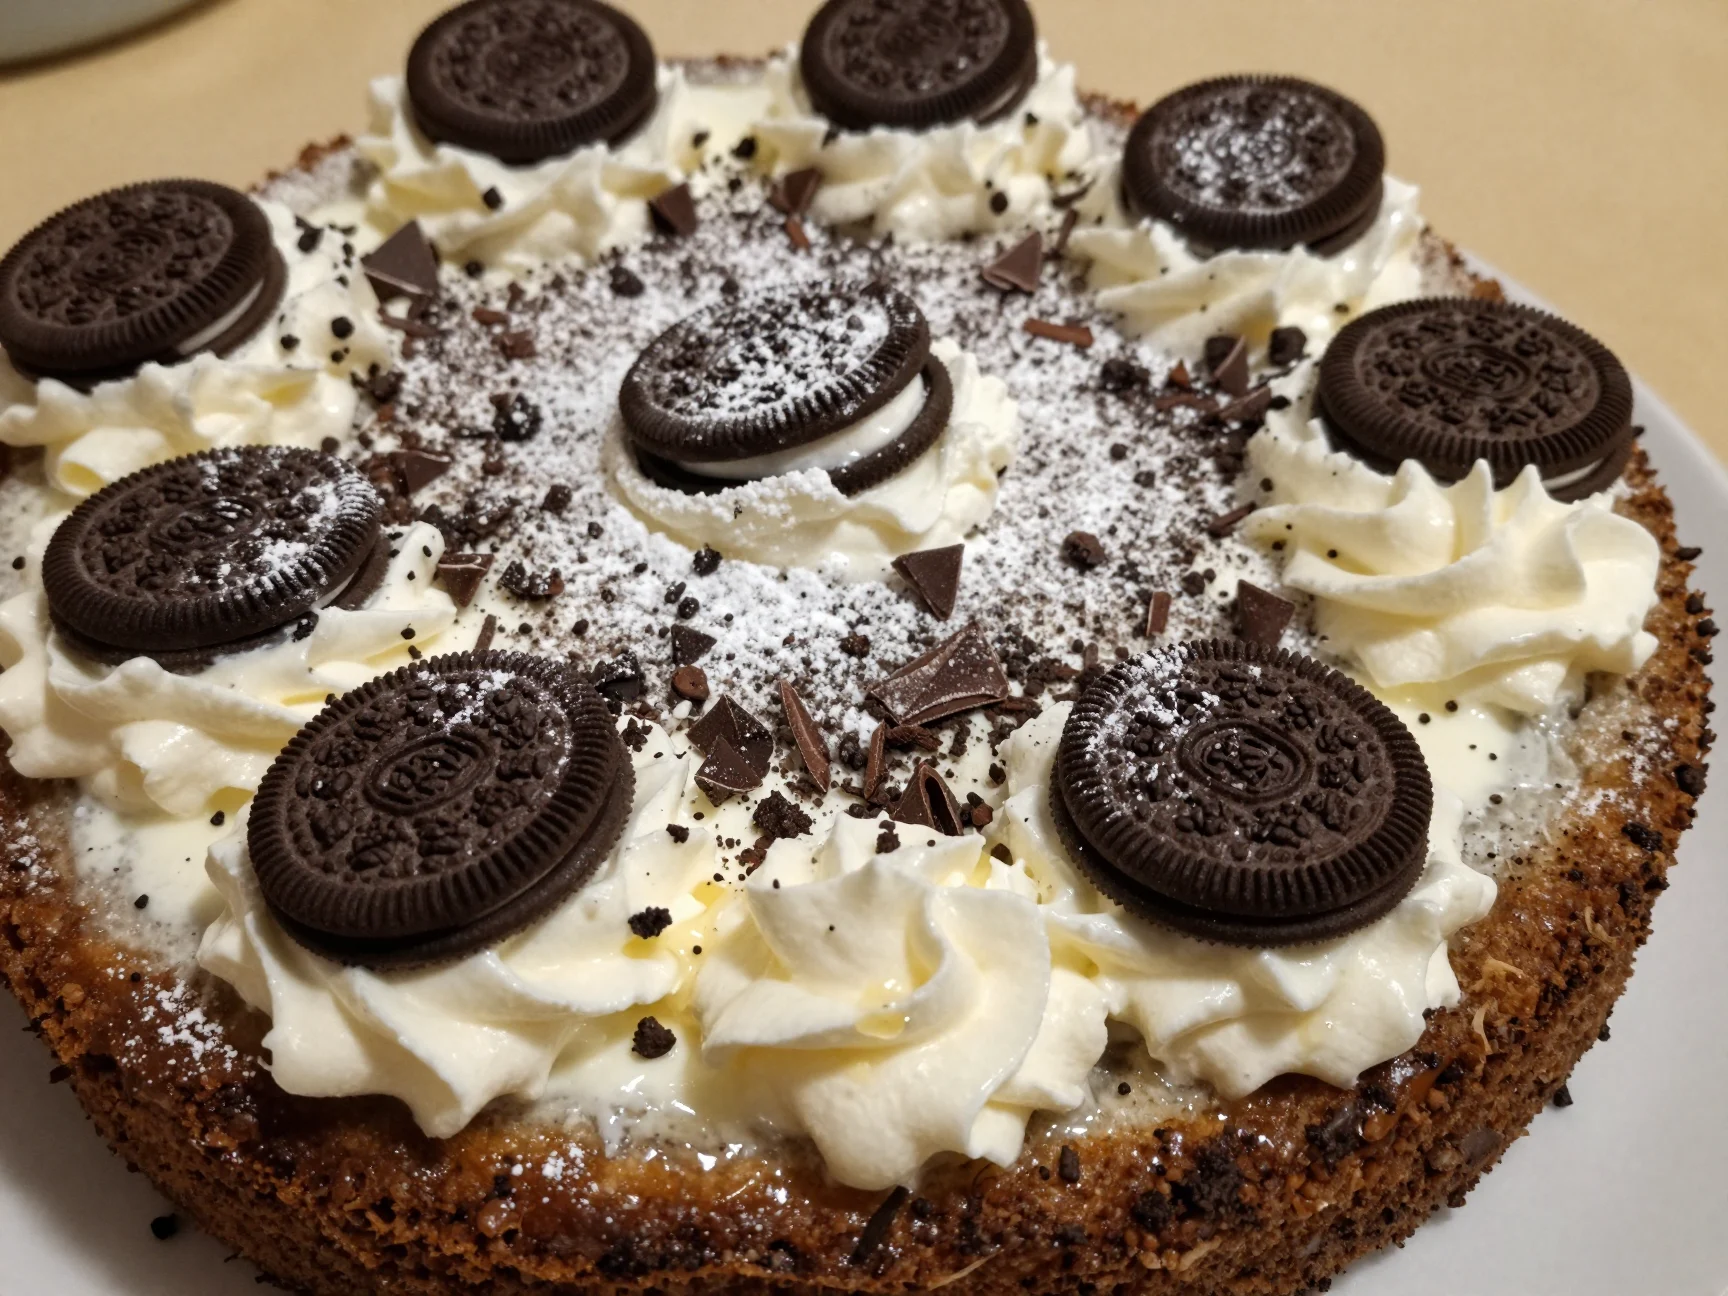
During this time, the cookies absorb moisture from the cream. They transform from hard biscuits into soft, cake-like layers. Just before serving, crush a few extra Oreos and sprinkle them over the top. You can also add chocolate shavings or a drizzle of chocolate syrup to your No Bake Oreo Icebox Cake for extra flair.
Pro Tips for Success
To ensure your No Bake Oreo Icebox Cake turns out perfectly every time, keep these professional tips in mind. Mateo always says that temperature control is everything in pastry work. Ensure your heavy cream is straight from the fridge.
If the cream is too warm, it will not hold its shape, and your No Bake Oreo Icebox Cake might collapse. Use a high-quality vanilla bean paste if you want to see those beautiful little black specks in your cream.
Another tip involves the dipping process. Only dip the cookies for one second. The goal is to jumpstart the softening process, not to saturate them.
If you over-dip, your No Bake Oreo Icebox Cake will become soggy rather than tender. Furthermore, give the cake ample time to set. I know it is tempting to slice into it early, but the chemistry needs time.
The moisture migration from the cream to the cookie is what creates the “cake” texture. If you use a springform pan, run a thin knife around the edge before releasing the sides. This ensures a clean look for your No Bake Oreo Icebox Cake.
Additionally, wipe your knife between every slice to maintain beautiful, sharp layers. These small details elevate a simple No Bake Oreo Icebox Cake into a professional-looking dessert.
To ensure your No Bake Oreo Icebox Cake turns out perfectly every time, keep these professional tips in mind. For another delightful dessert that requires no churning, explore No Churn Strawberry Ice Cream.
Storage & Reheating Tips
You should always store your No Bake Oreo Icebox Cake in the refrigerator. Because it contains fresh dairy, it cannot sit at room temperature for more than an hour. Keep the pan covered with plastic wrap or a lid to prevent the cream from absorbing other fridge odors.
The No Bake Oreo Icebox Cake will stay fresh and delicious for up to three or four days. Interestingly, many people find that the flavor peaks on the second day. However, after four days, the cookies may become a bit too soft.
You should never reheat a No Bake Oreo Icebox Cake. Heat will melt the whipped cream and destroy the entire structure. If you have leftovers that you cannot finish quickly, you can freeze them.
Wrap individual slices in plastic wrap and store them in a freezer-safe container. To eat, let a slice thaw in the fridge for twenty minutes. It will taste almost like an ice cream sandwich version of the No Bake Oreo Icebox Cake. This versatility makes it a fantastic make-ahead dessert for busy families like mine.
What to Serve With This Recipe
This No Bake Oreo Icebox Cake is quite rich, so I like to serve it with something refreshing. A side of fresh berries, such as raspberries or tart strawberries, cuts through the sweetness perfectly. My daughter Sofia loves a tall glass of cold milk with her slice.
Meanwhile, Mateo prefers a strong cup of black coffee or an espresso to balance the chocolate flavors. If you are serving this at a summer party, a cold hibiscus tea or a lemon-infused sparkling water works wonderfully. For a truly indulgent experience, you could serve the No Bake Oreo Icebox Cake alongside a scoop of vanilla bean ice cream.
However, the cake is quite filling on its own. We often enjoy it as a standalone treat after a light dinner of grilled chicken and salad. The simplicity of the No Bake Oreo Icebox Cake makes it the star of the show. No matter what you choose as a pairing, the smiles around the table will prove that this recipe is a winner.
This No Bake Oreo Icebox Cake is quite rich, so I like to serve it with something refreshing. For a savory complement, consider trying One Pot Creamy Tomato Gnocchi.
FAQs
Can I make No Bake Oreo Icebox Cake without a mixer?
Yes, you can whisk the cream by hand, but it requires significant effort and time. A hand mixer or stand mixer makes the process much easier and ensures the cream reaches the necessary stiff peaks. If you whisk by hand, use a large balloon whisk and keep your arm moving consistently until the No Bake Oreo Icebox Cake filling is thick.
How long does No Bake Oreo Icebox Cake need to chill?
You should chill the No Bake Oreo Icebox Cake for a minimum of six hours. For the absolute best results, let it rest in the refrigerator for twenty-four hours. This extended time allows the cookies to fully soften into a cake-like consistency. Rushing this process may leave the cookies too crunchy for a traditional icebox cake experience.
Is No Bake Oreo Icebox Cake freezer friendly?
Absolutely, this dessert freezes exceptionally well. You can freeze the entire No Bake Oreo Icebox Cake for up to a month. Ensure it is wrapped tightly to prevent freezer burn. When you are ready to serve, you can eat it partially frozen for a texture similar to ice cream cake, or thaw it completely in the fridge.
Can I use whipped topping instead of heavy cream?
You can use a stabilized whipped topping if you prefer a shortcut. However, fresh whipped cream provides a much richer and more authentic flavor for your No Bake Oreo Icebox Cake. If you choose the topping, you may want to skip the extra powdered sugar, as those products are already very sweet.
Why is my No Bake Oreo Icebox Cake runny?
A runny No Bake Oreo Icebox Cake usually happens if the whipped cream did not reach stiff peaks. Another cause could be using cream that was not cold enough. Ensure you beat the cream until it holds its shape firmly. Additionally, make sure you do not over-dip the cookies in milk, as excess liquid can thin out the cream layers over time.
The No Bake Oreo Icebox Cake is a delightful dessert that combines layers of chocolate cookies and whipped cream, creating a creamy and satisfying treat. This dessert is perfect for warm weather and requires no baking, making it an ideal choice for quick and easy gatherings; learn more about this delicious dessert here.
Nutrition Information (per serving)
This information is an estimate based on standard ingredients. We believe in moderation and enjoying every bite of this No Bake Oreo Icebox Cake with your loved ones.
| Nutrient | Amount per Serving |
|---|---|
| Calories | 385 kcal |
| Total Fat | 24g |
| Saturated Fat | 14g |
| Cholesterol | 65mg |
| Sodium | 210mg |
| Total Carbohydrates | 42g |
| Dietary Fiber | 1g |
| Sugars | 28g |
| Protein | 3g |
Creating this No Bake Oreo Icebox Cake brings so much light into our kitchen. I hope your family enjoys the creamy layers and the chocolatey goodness as much as Mateo, Sofia, Mia, and I do. Food truly is love, and this simple dessert is a testament to that philosophy. Enjoy every slice of your homemade No Bake Oreo Icebox Cake!
No Bake Oreo Icebox Cake
Ingredients
Method
- Chill a large glass or metal bowl in the freezer for 10 minutes.
- Pour cold heavy whipping cream into the chilled bowl, add vanilla extract and powdered sugar, and beat on medium-high speed until stiff peaks form.
- Prepare a 9x13 inch baking pan or springform pan.
- Dip Oreo cookies quickly in milk and layer them at the bottom of the pan.
- Spread one-third of the whipped cream over the cookie layer.
- Repeat the layering process until all cookies and cream are used, finishing with whipped cream on top.
- Cover with plastic wrap and refrigerate for at least 6 hours, preferably overnight.
- Before serving, garnish with crushed Oreos or chocolate shavings.
Notes
Or browse by category:
As an Amazon Associate I earn from qualifying purchases.