No Bake Cheesecake Bars
|
Getting your Trinity Audio player ready...
|
One sweltering summer afternoon, a few years back, my husband Mateo-a brilliant chef in his own right-walked through the door looking utterly exhausted. He had just finished a particularly demanding shift, and our girls, Maya (then 14) and Sofia (10), were buzzing with that endless teenage energy. We had a last-minute dinner invitation from friends, and I realized I had completely forgotten about dessert.
Panic started to bubble, but then I remembered a recipe I’d seen for a quick, no-fuss treat. “Evelyn,” Mateo sighed, collapsing onto the couch, “please tell me we aren’t making a soufflé tonight.” I just winked. In under 20 minutes of active prep, I whipped up what would become one of our family’s most requested desserts: these incredible No Bake Cheesecake Bars.
The magic of not turning on the oven on a hot day, the simplicity, and the sheer deliciousness of these creamy, dreamy bars completely won him over.
Even Mateo, with his high culinary standards, declared them “surprisingly excellent.” Now, they’re our go-to for potlucks, easy weeknight treats, and any time we crave something sweet without the fuss. These No Bake Cheesecake Bars truly embody our family’s belief that food is love, especially when it’s simple, nourishing, and brings everyone to the table with a smile.
Why You’ll Love These No Bake Cheesecake Bars
This recipe for No Bake Cheesecake Bars is a total game-changer, especially for busy moms like me. First, there’s absolutely no baking involved! This means you keep your kitchen cool, making these perfect for summer gatherings or when you just don’t want to heat up the house.
You simply assemble, chill, and serve. What could be easier? Second, the ingredient list is short and sweet, featuring pantry staples you likely already have on hand. Mateo always says that the best recipes use quality ingredients simply, and these bars are a perfect example.
Furthermore, these No Bake Cheesecake Bars are a fantastic make-ahead dessert. You can prepare them the day before your event, allowing them ample time to chill and firm up perfectly, which frees you up to enjoy your guests or tackle other tasks. My girls, Maya and Sofia, adore them.
They often ask for these for their school bake sales or when friends come over, and honestly, they disappear quickly every single time. The creamy texture, the tangy-sweet flavor, and the delightful graham cracker crust make these No Bake Cheesecake Bars an instant crowd-pleaser for any occasion.
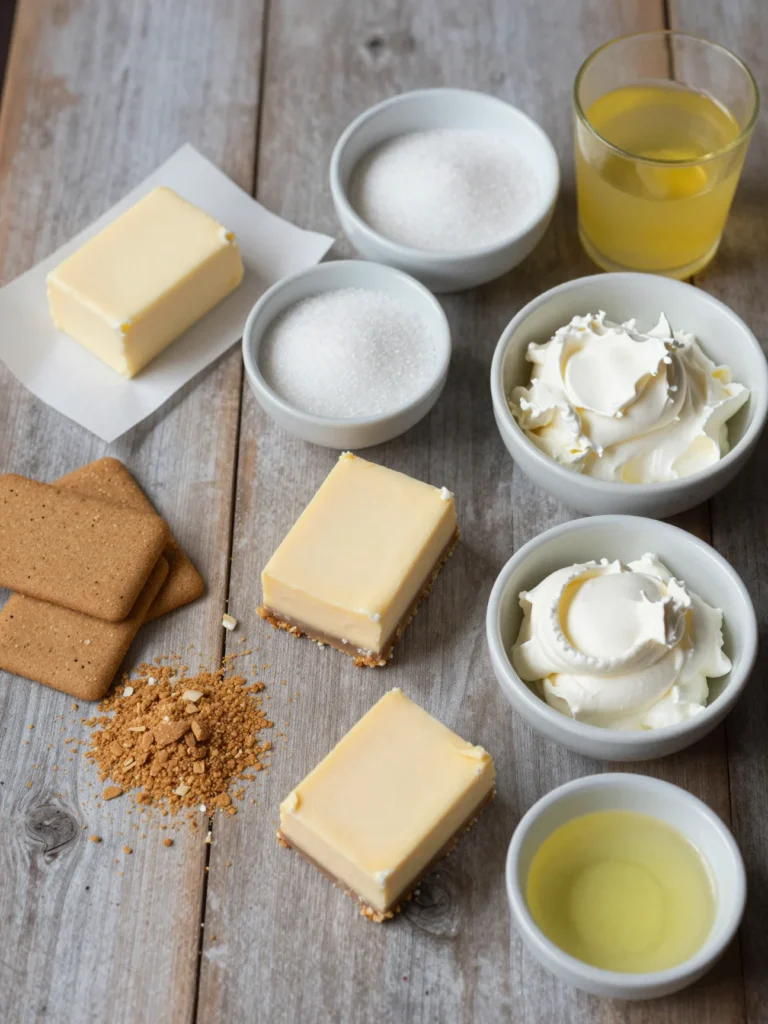
Ingredients You’ll Need
Making these delectable No Bake Cheesecake Bars requires just a few straightforward ingredients. You’ll find everything you need right at your local grocery store. We always opt for full-fat cream cheese for the best texture and flavor.
| Ingredient | Quantity | Notes |
|---|---|---|
| Graham Cracker Crumbs | 1 ½ cups | About 12-15 full graham cracker sheets, finely crushed |
| Unsalted Butter, melted | ½ cup (1 stick) | Use good quality butter for the best crust flavor |
| Granulated Sugar | ¾ cup (for filling) + 2 tbsp (for crust) | Adjust to your sweetness preference |
| Full-Fat Cream Cheese, softened | 2 (8-ounce) blocks | Crucial for a creamy texture, ensure it’s at room temperature |
| Heavy Cream (Cold) | 1 cup | Whips up best when very cold |
| Vanilla Extract | 1 teaspoon | Pure vanilla extract offers the best flavor |
| Lemon Juice (Optional) | 1 tablespoon | Adds a lovely tang to the cheesecake filling |
Substitutions & Variations
One of the beautiful things about these No Bake Cheesecake Bars is how adaptable they are. You can easily switch things up to suit your taste or what you have on hand.
* Crust Alternatives: While graham cracker is classic, try crushed Oreo cookies (use the whole cookie, filling and all, and reduce butter slightly), shortbread cookies, or even gluten-free cookies for a delicious twist. If you use Oreos, consider a chocolatey No Bake Cheesecake Bars filling.
* Flavorful Fillings: Infuse your No Bake Cheesecake Bars with different extracts.
A hint of almond extract works beautifully, or a dash of peppermint for a holiday feel. You could even fold in a few tablespoons of fruit purée, like raspberry or mango, for a fruity take on these simple bars. Just be careful not to add too much liquid, as it can affect the set.
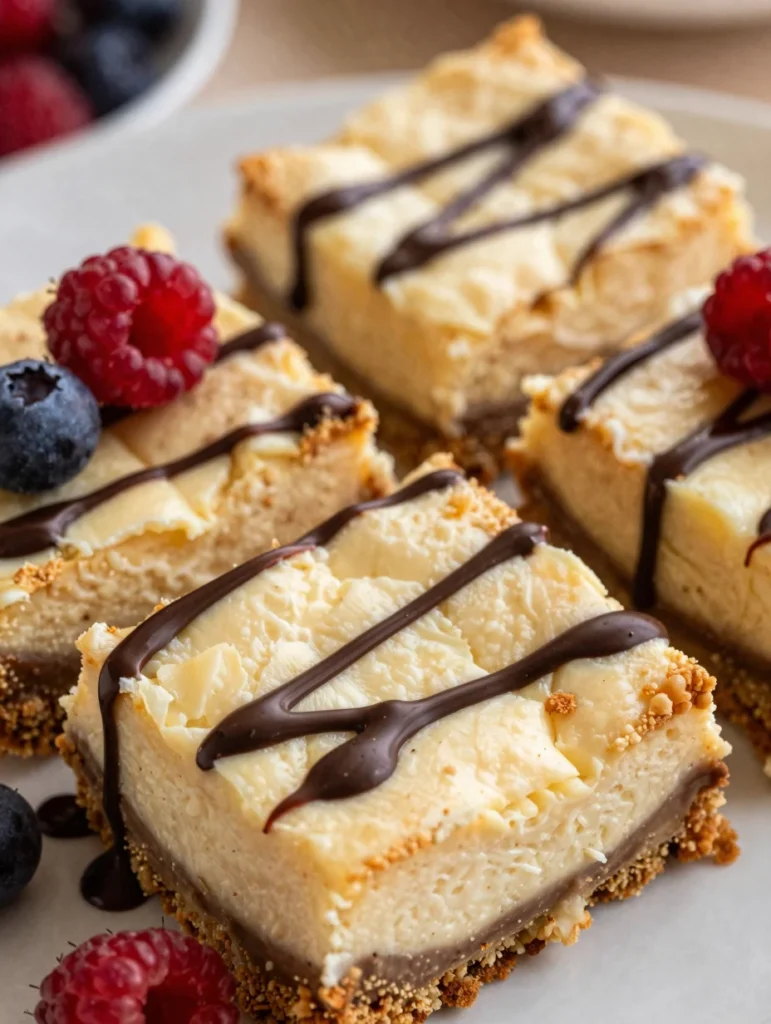
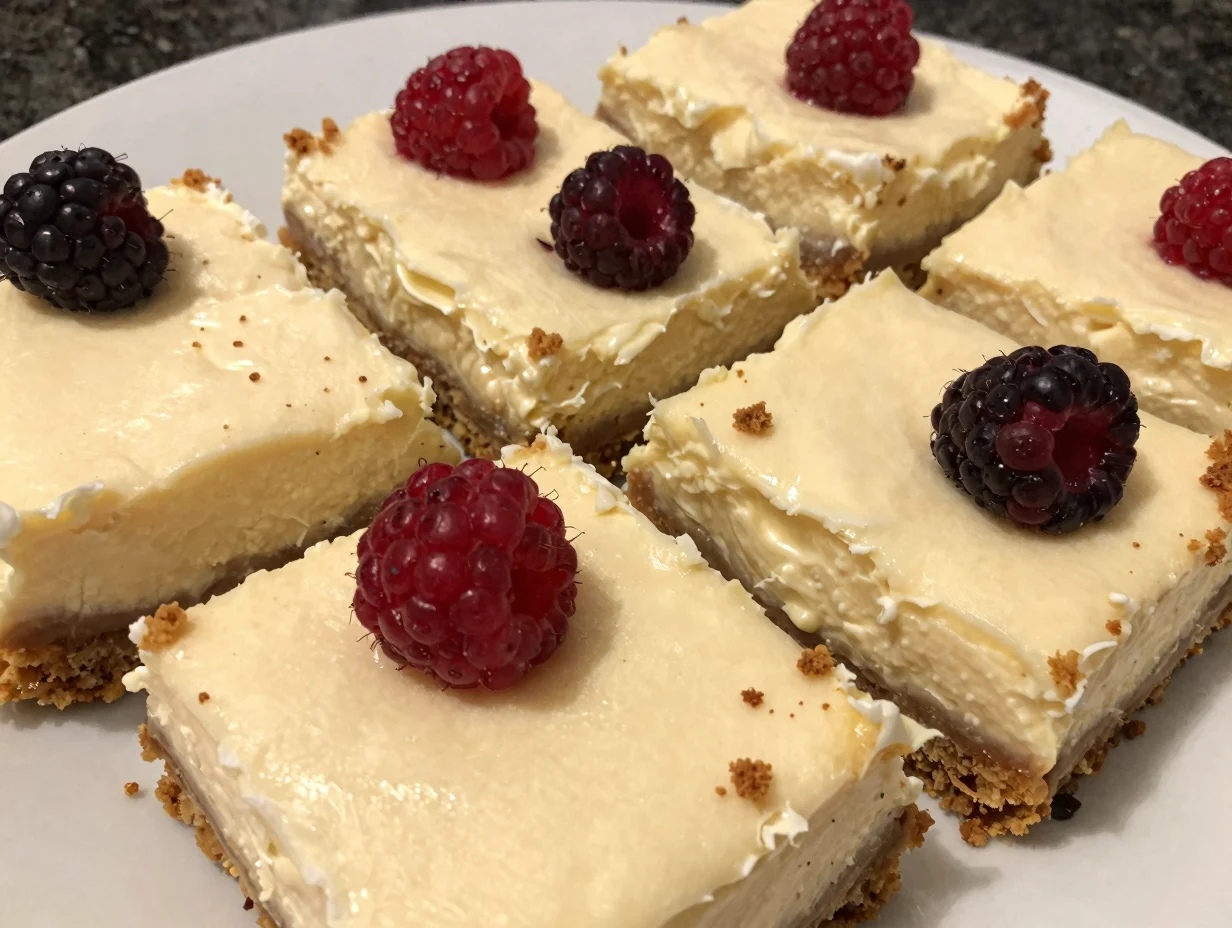
* Swirls and Toppings: The possibilities are endless! Drizzle melted chocolate or caramel sauce over the top before chilling. Fresh berries, like strawberries, blueberries, or raspberries, add a lovely fresh contrast.
A dollop of homemade whipped cream with a sprinkle of lemon zest elevates these No Bake Cheesecake Bars even further. For a truly indulgent experience, sprinkle some mini chocolate chips or chopped nuts.
* Dairy-Free Option: For those avoiding dairy, you can experiment with dairy-free cream cheese alternatives and coconut cream (the thick part from a can of full-fat coconut milk, chilled overnight) instead of heavy cream.
This will give you delicious dairy-free No Bake Cheesecake Bars.
* Added Citrus: If you love a bright, zesty flavor, increase the lemon juice slightly or add some finely grated lemon zest to the filling. This makes for wonderfully refreshing No Bake Cheesecake Bars.
One of the beautiful things about these No Bake Cheesecake Bars is how adaptable they are. You can explore other delicious options like Zucchini Noodles with Pesto for a fresh twist.
Step-by-Step Instructions
Making these No Bake Cheesecake Bars is incredibly simple. Follow these steps for a perfect dessert every time.
1. Prepare Your Pan: Line a 9×13 inch baking pan with parchment paper, leaving an overhang on the sides. This creates “handles” making it easy to lift the entire batch of No Bake Cheesecake Bars out of the pan later.
2. Make the Crust: In a medium bowl, combine the graham cracker crumbs and 2 tablespoons of granulated sugar. Pour in the melted butter and stir until the crumbs are evenly moistened.
Press the mixture firmly into the bottom of the prepared pan. Use the bottom of a glass or a flat measuring cup to get a compact, even layer. Place the crust in the freezer for 10-15 minutes to firm up while you prepare the filling.
3. Whip the Cream Cheese: In a large mixing bowl, using an electric mixer, beat the softened cream cheese on medium speed until smooth and creamy, about 2-3 minutes. Make sure there are no lumps.
4. Add Sugar and Vanilla: Gradually add the ¾ cup of granulated sugar to the cream cheese, beating until well combined. Stir in the vanilla extract and optional lemon juice.
The filling for your No Bake Cheesecake Bars is coming together beautifully!
5. Whip the Heavy Cream: In a separate, chilled bowl, whip the cold heavy cream until stiff peaks form.
Be careful not to over-whip, as it can turn grainy.
6. Combine Filling: Gently fold the whipped cream into the cream cheese mixture using a rubber spatula.
Mix until just combined and no streaks of cream remain. Over-mixing at this stage can deflate the whipped cream and result in a less airy texture for your No Bake Cheesecake Bars.
7.
Assemble and Chill: Pour the cheesecake filling evenly over the chilled graham cracker crust. Spread it smoothly with an offset spatula or the back of a spoon. Cover the pan loosely with plastic wrap.
Refrigerate the No Bake Cheesecake Bars for at least 4 hours, or preferably overnight, to allow them to set completely. This chilling time is crucial for perfectly firm bars.
8.
Slice and Serve: Once thoroughly chilled, use the parchment paper overhang to lift the entire cheesecake out of the pan. Place it on a cutting board. Use a sharp knife, wiping it clean between cuts, to slice the cheesecake into 12-16 bars. Enjoy your homemade No Bake Cheesecake Bars!
Pro Tips for Success
Achieving perfect No Bake Cheesecake Bars every time is easier than you think with a few simple tricks Mateo taught me.

* Room Temperature Cream Cheese: This is non-negotiable! Softened cream cheese blends smoothly without lumps, creating a wonderfully creamy filling. If your cream cheese is cold, it will be lumpy, and no amount of beating will make it perfectly smooth.
I usually take it out of the fridge an hour or two before I plan to start.
* Cold Heavy Cream: For stiff, fluffy whipped cream, ensure your heavy cream is very cold. You can even chill your mixing bowl and whisk attachment for 10-15 minutes before whipping.
This helps the cream whip up faster and hold its volume better, leading to light and airy No Bake Cheesecake Bars.
* Don’t Over-Mix: Once you’ve folded the whipped cream into the cream cheese mixture, stop mixing as soon as it’s combined. Over-mixing can deflate the whipped cream, resulting in a denser, less creamy filling for your No Bake Cheesecake Bars.
* Firm Crust: Press the graham cracker crust firmly into the pan. This prevents it from crumbling when you cut the bars. Chilling it briefly in the freezer also helps it set quickly.
* Proper Chilling is Key: This is arguably the most important step for any no-bake cheesecake. The minimum 4 hours is essential, but overnight chilling truly yields the best, firmest No Bake Cheesecake Bars. Patience here really pays off!
* Clean Cuts: For neat, professional-looking No Bake Cheesecake Bars, use a long, sharp knife. Run the knife under hot water and wipe it clean between each cut. This creates clean edges and prevents the cheesecake from sticking to the blade.
Achieving perfect No Bake Cheesecake Bars every time is easier than you think with a few simple tricks Mateo taught me. For more culinary tips, check out Spicy Peanut Noodles that will elevate your cooking skills.
Storage & Reheating Tips
No Bake Cheesecake Bars are fantastic for making ahead, and they store beautifully.
* Refrigeration: Store any leftover No Bake Cheesecake Bars in an airtight container in the refrigerator for up to 5-7 days. The parchment paper in the pan makes it easy to transfer individual bars into a container.
* Freezing: Yes, you can freeze these No Bake Cheesecake Bars!
For best results, freeze them individually on a baking sheet until solid. Then, transfer the frozen bars to an airtight freezer-safe container or a heavy-duty freezer bag, separating layers with parchment paper. They will keep well for up to 2-3 months.
Thaw frozen No Bake Cheesecake Bars in the refrigerator overnight before serving. Do not attempt to thaw them at room temperature quickly, as this can affect their texture. Remember, these are “no bake” so no “reheating” is needed, just thawing if frozen.
What to Serve With This Recipe
These delightful No Bake Cheesecake Bars are a perfect standalone dessert, but you can certainly enhance the experience with a few thoughtful additions.
* Fresh Fruit: A simple bowl of fresh berries-strawberries, blueberries, raspberries, or a mix-makes an elegant and refreshing accompaniment. The tartness of the fruit beautifully balances the sweetness of the No Bake Cheesecake Bars.
* Coffee or Tea: A freshly brewed cup of coffee, perhaps a rich espresso, or a soothing herbal tea, pairs wonderfully with the creamy texture of the bars.
Mateo loves a strong cup of black coffee with his.
* Whipped Cream or Coulis: For an extra touch of indulgence, offer a dollop of freshly whipped cream or a drizzle of fruit coulis (like raspberry or strawberry sauce) on the side. This adds another layer of flavor and a touch of sophistication to your No Bake Cheesecake Bars.
* After a Light Meal: Since these bars are rich and satisfying, they are an ideal dessert after a lighter meal. Think grilled chicken and a fresh salad, or a simple pasta dish.
* Ice Cream: If you’re feeling extra decadent, a small scoop of vanilla bean ice cream alongside these No Bake Cheesecake Bars creates a truly luxurious dessert experience.
These delightful No Bake Cheesecake Bars are a perfect standalone dessert, but you can certainly enhance the experience with a few thoughtful additions. Consider pairing them with Mango Jalapeño Salsa for a refreshing contrast.
FAQs
Making No Bake Cheesecake Bars often brings up a few common questions. Here are the answers to help you achieve cheesecake perfection every time.
How long do no bake cheesecake bars last in the fridge?
You can store your delicious No Bake Cheesecake Bars in an airtight container in the refrigerator for up to 5 to 7 days. They maintain their best texture and flavor within the first few days, but they are still perfectly safe and enjoyable for up to a week.
Can you freeze no bake cheesecake bars?
Absolutely! No Bake Cheesecake Bars freeze beautifully. For optimal results, place the cut bars on a baking sheet and freeze until solid.
Once frozen, transfer them to an airtight, freezer-safe container or bag, separating layers with parchment paper. They will last for 2-3 months. Thaw them in the refrigerator overnight before serving to maintain their creamy consistency.
Why is my no bake cheesecake runny?
A runny no-bake cheesecake often comes down to a few factors. Firstly, ensure your cream cheese is full-fat and softened, not melted. Secondly, make sure your heavy cream is very cold and whipped to stiff peaks; under-whipped cream won’t provide enough structure.
Finally, insufficient chilling time is a common culprit. These No Bake Cheesecake Bars need at least 4 hours, but ideally overnight, to set properly.
What is the best way to cut no bake cheesecake bars?
For clean, neat slices, use a long, sharp knife. Before each cut, run the knife under hot water and wipe the blade completely clean. This prevents the cheesecake from sticking and dragging, giving you perfect edges for your No Bake Cheesecake Bars. Lifting the entire chilled cheesecake from the pan using the parchment paper overhang before cutting also helps.
Can I use a different crust for no bake cheesecake bars?
Yes, you certainly can! While graham cracker crust is traditional, you have many options. Crushed Oreo cookies (whole cookie), vanilla wafers, or even shortbread cookies make excellent alternatives. Just ensure you use the correct amount of melted butter to bind your chosen crumbs, typically ½ cup per 1½ cups of crumbs, but adjust slightly if needed for a cohesive crust for your No Bake Cheesecake Bars.
No Bake Cheesecake Bars are a popular dessert option that combines the creamy texture of cheesecake with the convenience of no baking required. These treats are often made with simple ingredients and can be customized with various toppings, making them a favorite for gatherings and summer events. For more information, visit this cheesecake page.
Nutrition Information (per serving)
This nutrition information is an estimate based on 16 servings per recipe and typical ingredient values. Actual values may vary depending on specific brands and ingredient substitutions.
| Nutrient | Amount (approx.) |
|---|---|
| Calories | 350 kcal |
| Total Fat | 28 g |
| Saturated Fat | 17 g |
| Cholesterol | 90 mg |
| Sodium | 200 mg |
| Total Carbohydrates | 22 g |
| Dietary Fiber | 0.5 g |
| Total Sugars | 18 g |
| Protein | 4 g |
No Bake Cheesecake Bars
Ingredients
Method
- Prepare Your Pan: Line a 9x13 inch baking pan with parchment paper, leaving an overhang on the sides.
- Make the Crust: Combine graham cracker crumbs and 2 tablespoons of sugar. Pour in melted butter and stir until moistened. Press into the bottom of the pan and freeze for 10-15 minutes.
- Whip the Cream Cheese: Beat softened cream cheese until smooth and creamy.
- Add Sugar and Vanilla: Gradually add ¾ cup sugar, beating until combined. Stir in vanilla extract and optional lemon juice.
- Whip the Heavy Cream: In a separate bowl, whip cold heavy cream until stiff peaks form.
- Combine Filling: Gently fold whipped cream into the cream cheese mixture until just combined.
- Assemble and Chill: Pour cheesecake filling over the crust, spread evenly, cover, and refrigerate for at least 4 hours or overnight.
- Slice and Serve: Lift cheesecake out of the pan using parchment paper, slice into bars, and enjoy.
Notes
Or browse by category:
As an Amazon Associate I earn from qualifying purchases.