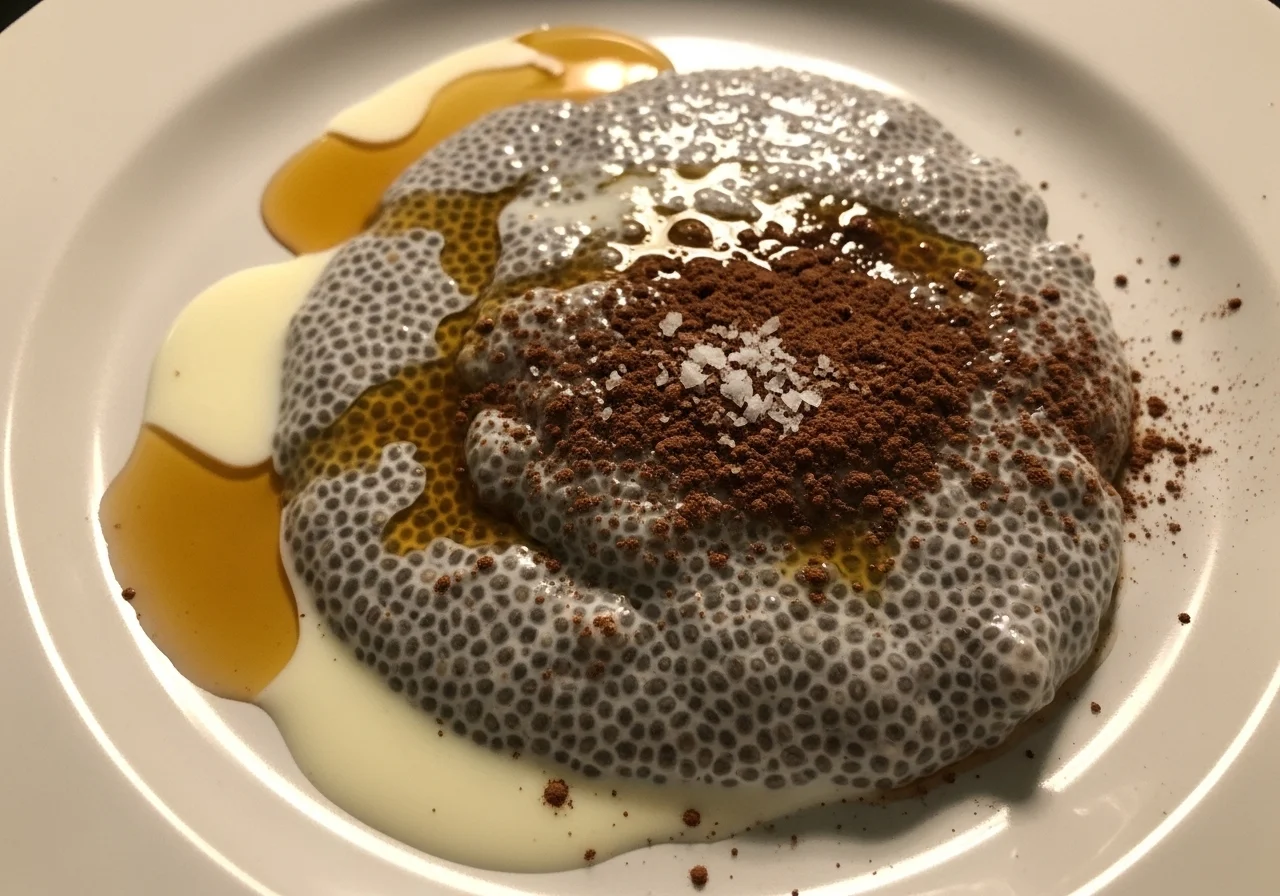
Fluffy Chia Pudding Mousse: A Healthy Family Treat
|
Getting your Trinity Audio player ready...
|
Last Sunday morning, my youngest daughter Sofia wandered into the kitchen with that look-you know, the one where she’s craving something sweet but trying to convince me it should be healthy. She spotted the jar of chia seeds in my pantry and asked if we could make “that pudding thing, but like, fluffier.” That’s when inspiration struck. I grabbed my hand mixer and transformed our usual chia pudding into the most incredible chia pudding mousse.
The texture was cloud-like, the flavor was divine, and within minutes, both girls were hovering around the kitchen island with spoons in hand. Mateo even stopped prepping for his dinner service to try a bite, giving me that approving nod that means I’ve created something special.
This chia pudding mousse has become our family’s go-to treat ever since. It’s lighter than traditional chia pudding, airier than regular mousse, and packed with nutrients that make me feel good about serving it any time of day.
The beauty of this recipe lies in its simplicity, you’re essentially whipping air into your chia pudding base to create something extraordinary. Whether you need a quick breakfast, an afternoon snack, or a guilt-free dessert, this chia pudding mousse delivers on every front.
Why You’ll Love This Chia Pudding Mousse
This chia pudding mousse recipe hits all the right notes for busy families. First, it requires minimal hands-on time, just blend, whip, and chill. I can prep this chia pudding mousse in under ten minutes, which fits perfectly into my hectic schedule.
Second, the texture is absolutely dreamy. Unlike regular chia pudding that can feel dense, this mousse version is incredibly light and airy.
Moreover, this recipe is naturally nutritious. Chia seeds pack omega-3 fatty acids, fiber, and protein into every spoonful. My girls don’t even realize they’re eating something that benefits their bodies because it tastes like an indulgent treat.
Additionally, you can customize this chia pudding mousse to match any flavor profile you’re craving. Chocolate, vanilla, berry, or tropical, the possibilities are endless.
Furthermore, this recipe works beautifully for meal prep. I make a big batch every Sunday, and we enjoy it throughout the week. The chia pudding mousse stays fresh in the refrigerator for up to five days, making it a practical choice for families on the go. Plus, it’s naturally gluten-free and can easily be made vegan, accommodating various dietary preferences.
Ingredients You’ll Need
Gathering ingredients for this chia pudding mousse couldn’t be simpler. I keep these staples stocked in my kitchen at all times. Here’s everything you need to create this magical dessert:
| Ingredient | Amount |
|---|---|
| Chia seeds | 1/2 cup |
| Milk (dairy or non-dairy) | 2 cups |
| Heavy cream or coconut cream | 1 cup |
| Maple syrup or honey | 3-4 tablespoons |
| Vanilla extract | 1 teaspoon |
| Cocoa powder (optional) | 2 tablespoons |
| Pinch of salt | 1/8 teaspoon |
The quality of your ingredients directly impacts the final result. I recommend using organic chia seeds when possible, as they tend to gel more consistently. For the milk component, I typically use almond milk because it creates a neutral base that doesn’t overpower other flavors. However, whole milk produces an extra creamy chia pudding mousse if you’re not avoiding dairy.
The cream is what transforms this from regular chia pudding into mousse territory. Heavy whipping cream gives you the most luxurious texture, but coconut cream works wonderfully for a dairy-free version. Make sure your cream is cold, this helps it whip up properly and creates those beautiful airy peaks.
Substitutions & Variations
One reason I adore this chia pudding mousse is its versatility. You can adapt it to suit your pantry, dietary needs, or flavor preferences. For a vegan chia pudding mousse, simply swap heavy cream for full-fat coconut cream and use maple syrup instead of honey. The result is just as delicious and completely plant-based.
If you’re watching sugar intake, reduce the sweetener or use a sugar-free alternative like monk fruit sweetener. I’ve tested this chia pudding mousse with stevia, and it works beautifully. Just remember that some sugar substitutes are sweeter than regular sugar, so adjust accordingly.
For flavor variations, the sky’s the limit. Create a chocolate chia pudding mousse by adding cocoa powder and a pinch of espresso powder. Try a berry version by blending in fresh or frozen strawberries, raspberries, or blueberries.
Mateo recently made a coffee-flavored version using cold brew concentrate that was absolutely incredible. You can also add peanut butter, almond butter, or tahini for a nutty twist.
Protein powder works wonderfully in this recipe too. I sometimes add a scoop of vanilla protein powder to boost the nutritional profile, especially when serving this chia pudding mousse for breakfast. Just adjust the liquid slightly if your mixture becomes too thick.
Step-by-Step Instructions
Making this chia pudding mousse involves two simple stages. First, you create the chia pudding base, then you whip it into a mousse. Let me walk you through each step to ensure perfect results every time.
Step 1: Combine the chia seeds, milk, half of your sweetener, vanilla extract, and salt in a medium bowl. Whisk thoroughly to prevent clumping. The chia seeds should distribute evenly throughout the liquid.
Let this mixture sit for five minutes, then whisk again. This prevents the seeds from settling at the bottom.
Step 2: Cover your chia pudding base and refrigerate for at least four hours, or preferably overnight. The chia seeds need this time to fully absorb the liquid and create that characteristic gel-like texture. I usually prepare this step before bed so it’s ready the next morning.
Step 3: Once your chia pudding has fully set, transfer it to a blender or food processor. Blend on high speed for 30-60 seconds until the mixture becomes smooth and the chia seeds break down somewhat. This step is crucial for achieving that mousse-like consistency rather than maintaining the typical chia pudding texture.
Step 4: In a separate bowl, whip your cold cream with the remaining sweetener until stiff peaks form. This usually takes 2-3 minutes with an electric mixer. The cream should look fluffy and hold its shape when you lift the beaters. Don’t over-whip, or you’ll end up with butter instead of mousse.
Step 5: Gently fold the whipped cream into the blended chia mixture. Use a spatula and make wide, sweeping motions from the bottom of the bowl upward. This folding technique preserves the airiness you’ve created. Your chia pudding mousse should look light, fluffy, and absolutely irresistible.
Step 6: Divide your chia pudding mousse into serving glasses or jars. Refrigerate for at least one hour before serving to let the flavors meld and the texture set properly. This final chill time makes a noticeable difference in the overall experience.
Pro Tips for Success
After making this chia pudding mousse dozens of times, I’ve learned several tricks that guarantee success. First, always chill your mixing bowl and beaters before whipping cream. This keeps everything cold and helps the cream whip up faster and hold its structure better. I stick mine in the freezer for ten minutes while I blend the chia pudding base.
Second, don’t skip the blending step. Some people try to fold whipped cream directly into unblended chia pudding, but this creates an uneven texture with gel pockets. Blending the chia pudding first ensures a smooth, uniform base for your chia pudding mousse. The texture becomes silky rather than chunky.
Third, taste and adjust sweetness before the final folding step. Everyone’s sweetness preference differs, and different sweeteners have varying levels of intensity. I always taste the blended chia mixture and the whipped cream separately, adjusting if needed. It’s much easier to add sweetness now than after everything is combined.
Additionally, fold gently but thoroughly. The goal is to incorporate the whipped cream without deflating it completely. Some people worry so much about being gentle that they end up with streaks of cream throughout their chia pudding mousse. Take your time, use confident strokes, and stop when you no longer see white streaks.
Finally, serve your chia pudding mousse in clear glasses to show off those beautiful layers. I like to add fresh fruit between layers or on top for visual appeal. Berries, sliced kiwi, or mango chunks work wonderfully. A sprinkle of granola, coconut flakes, or cacao nibs adds delightful texture contrast.
Storage & Reheating Tips
This chia pudding mousse stores exceptionally well, making it perfect for meal prep. Transfer portions into individual airtight containers or jars and refrigerate for up to five days. The mousse maintains its texture beautifully throughout the week, though it may become slightly denser over time as the chia seeds continue absorbing moisture.
I don’t recommend freezing this chia pudding mousse, as the texture changes dramatically upon thawing. The whipped cream component separates, and you lose that signature airy quality. Instead, make smaller batches more frequently to ensure you’re always enjoying it at peak freshness.
When ready to serve leftover chia pudding mousse, give it a gentle stir if the mixture has separated slightly. Sometimes liquid pools at the bottom after sitting for a day or two. A quick fold brings everything back together. Add fresh toppings right before eating to maintain their crunch and visual appeal.
If you’ve made just the chia pudding base and haven’t whipped the cream yet, you can store it separately for up to one week. This gives you flexibility to whip up fresh chia pudding mousse whenever the craving strikes. Simply blend the base, whip fresh cream, and fold together.
What to Serve With This Recipe
This versatile chia pudding mousse works for any meal or occasion. For breakfast, I serve it alongside fresh fruit salad, whole grain toast with almond butter, or a veggie-packed omelet. The protein and healthy fats in the chia pudding mousse provide sustained energy throughout the morning.
As an afternoon snack, pair this chia pudding mousse with a handful of nuts or a piece of dark chocolate. Sofia loves it with graham crackers for dipping, turning it into an interactive treat. The combination satisfies sweet cravings while providing nutritional benefits.
For dessert, this chia pudding mousse shines alongside lighter fare. Serve it after a heavy meal when you want something sweet but not overly rich. I’ve served it at dinner parties layered in elegant glasses with fresh berries and mint leaves. Guests always ask for the recipe, amazed that something so simple can taste so sophisticated.
Mateo sometimes uses this chia pudding mousse as a cake filling or topping. He’s created stunning parfaits with layers of mousse, crushed cookies, and fruit compote. The mousse also works beautifully as a topping for pancakes, waffles, or French toast, offering a healthier alternative to whipped cream.
During summer months, I freeze small portions in popsicle molds for a refreshing frozen treat. The chia pudding mousse becomes a creamy, nutritious ice pop that both kids and adults enjoy. Top with chocolate chips or fruit pieces before freezing for added interest.
FAQs
Can I make chia pudding mousse without a blender?
Yes, you can make chia pudding mousse without a blender, though the texture will be slightly different. Simply whisk the set chia pudding vigorously by hand to break down some of the gel texture, then fold in your whipped cream. The result won’t be quite as smooth, but it’s still delicious. You’ll have more visible chia seeds throughout, which some people actually prefer.
How long does chia pudding mousse need to set?
The chia pudding base needs at least four hours to set properly, though overnight is ideal. After whipping and folding in the cream, the finished chia pudding mousse benefits from another hour of chilling before serving. This allows the flavors to meld and the texture to firm up slightly. In total, plan for at least five to six hours from start to finish.
Why is my chia pudding mousse too thick or too thin?
Thickness issues usually relate to the chia-to-liquid ratio or whipping time. If your chia pudding mousse is too thick, you used too many chia seeds or over-whipped your cream. Add a splash of milk to thin it out.
If it’s too thin, you may not have let the chia pudding set long enough, or you under-whipped your cream. Let it chill longer to firm up, or fold in a bit more whipped cream.
Can I use chia pudding mousse as a frosting?
Absolutely! This chia pudding mousse works wonderfully as a cake frosting or filling, especially for lighter cakes. Make sure to whip your cream to very stiff peaks and use slightly less milk in the chia base for a firmer consistency. Keep cakes frosted with chia pudding mousse refrigerated, as the mousse won’t hold up at room temperature like traditional buttercream.
Is chia pudding mousse good for weight loss?
Chia pudding mousse can support weight loss goals when consumed in moderation. Chia seeds provide fiber and protein that promote satiety, helping you feel full longer. However, the cream and sweeteners add calories, so watch your portion sizes.
You can lighten the recipe by using less cream, more milk, or a sugar-free sweetener. The nutritional benefits of chia seeds, omega-3s, fiber, and protein, make this a healthier alternative to traditional desserts.
Nutrition Information (per serving)
| Nutrient | Amount |
|---|---|
| Calories | 245 |
| Total Fat | 18g |
| Saturated Fat | 10g |
| Cholesterol | 45mg |
| Sodium | 85mg |
| Total Carbohydrates | 16g |
| Dietary Fiber | 6g |
| Sugars | 8g |
| Protein | 5g |
| Calcium | 180mg |
| Iron | 2mg |
This nutritional information is approximate and based on a recipe yielding six servings. Values will vary depending on the specific ingredients you use, particularly the type of milk and cream. Using coconut cream instead of heavy cream will alter the fat content, while choosing a different sweetener affects the sugar and calorie counts. This chia pudding mousse provides an excellent source of omega-3 fatty acids and fiber, making it a nutritious choice compared to conventional desserts.
chia pudding mousse
Ingredients
Method
- Combine the chia seeds, milk, half of your sweetener, vanilla extract, and salt in a medium bowl. Whisk thoroughly to prevent clumping. Let this mixture sit for five minutes, then whisk again.
- Cover your chia pudding base and refrigerate for at least four hours, or preferably overnight.
- Once your chia pudding has fully set, transfer it to a blender or food processor. Blend on high speed for 30-60 seconds until the mixture becomes smooth.
- In a separate bowl, whip your cold cream with the remaining sweetener until stiff peaks form.
- Gently fold the whipped cream into the blended chia mixture using a spatula.
- Divide your chia pudding mousse into serving glasses or jars. Refrigerate for at least one hour before serving.
Notes
Or browse by category:
As an Amazon Associate I earn from qualifying purchases.