Looking for a snack that’s easy, addictively delicious, and perfect for any occasion? Say hello to Muddy Buddies—a crunchy, chocolatey, sweet treat also known as Puppy Chow. Whether you’re prepping for a holiday party, packing something fun for your kids, or simply craving a nostalgic bite, this no-bake recipe is a go-to favorite across America.
In this complete guide, you’ll discover everything you need to know about making Muddy Buddies from scratch, from classic recipes to fun variations and storage hacks. You’ll also learn how to make allergy-friendly versions, avoid common mistakes, and even turn this treat into an unforgettable homemade gift.
Don’t miss our step-by-step no-bake treat ideas if you’re looking to experiment with more snack mixes!
What Are Muddy Buddies?
The Origin and History of Muddy Buddies
Muddy Buddies, also affectionately known as Puppy Chow, are a beloved American snack that’s been around for decades. This sweet treat typically features Chex cereal coated in melted chocolate, peanut butter, and powdered sugar. While General Mills trademarked the name Muddy Buddies in the 2000s, the recipe itself has been passed around Midwestern kitchens since the ’80s.
The treat gained popularity through community cookbooks, holiday potlucks, and school bake sales. It wasn’t until Chex officially promoted it as a snack mix that it truly took off nationally. Now, it’s a staple during holidays like Christmas and Thanksgiving—but let’s be honest, it’s a hit any time of year.
What makes this snack so special? It’s the perfect blend of texture and flavor: crispy cereal, creamy chocolate-peanut butter coating, and that sweet powdered sugar finish.
Why Are They Also Called Puppy Chow?
The alternate name, Puppy Chow, stems from its appearance—coated cereal pieces resemble dry dog food. Rest assured, though, it’s only for humans. Kids and adults alike have long been amused by the name, and it sticks because it’s memorable.
While “Muddy Buddies” is the commercial name you’ll find on Chex packaging, “Puppy Chow” is still widely used in homes, food blogs, and potlucks. Regional naming differences often come into play too—some parts of the U.S. might call it Monkey Munch or Reindeer Chow during the holidays.
Whether you call it Muddy Buddies or Puppy Chow, one thing’s for sure: you’ll call it delicious.
Essential Ingredients for Perfect Muddy Buddies
Classic Ingredients You Need
The magic of Muddy Buddies lies in its simplicity. You don’t need fancy tools or rare ingredients—just a few pantry staples that come together in delicious harmony. Here’s what you’ll need for the classic version:
| Ingredient | Amount | Purpose |
|---|---|---|
| Rice or Corn Chex | 9 cups | Crunchy base |
| Semisweet chocolate chips | 1 cup | Melty, rich chocolate coating |
| Creamy peanut butter | ½ cup | Adds smooth texture & nutty flavor |
| Unsalted butter | ¼ cup | Helps the chocolate melt smoothly |
| Vanilla extract | 1 tsp | Boosts flavor |
| Powdered sugar | 1½ cups | Sweet coating, signature finish |
You can melt the chocolate, peanut butter, and butter together in a microwave-safe bowl, then mix in the vanilla before pouring over the Chex cereal.
Once coated, toss the mixture in a large plastic bag with powdered sugar and shake until every piece is evenly covered. It’s that easy!
Looking for inspiration? Try our easy chocolate snack recipes for beginners to experiment with similar flavor combos.
Substitution Options for Allergies or Diet Preferences
Need a nut-free, gluten-free, or dairy-free version? No problem—Muddy Buddies are super adaptable. Here’s how to tweak the recipe:
Nut-Free Version:
- Replace peanut butter with sunflower seed butter or Wowbutter.
- Use allergy-safe chocolate chips (e.g., Enjoy Life brand).
Dairy-Free Version:
- Use vegan butter or coconut oil in place of regular butter.
- Opt for dairy-free chocolate chips like Hu or Enjoy Life.
Gluten-Free Version:
- Make sure to use gluten-free certified Chex cereal (Rice Chex and Corn Chex are naturally gluten-free but always check labels).
Low Sugar / Keto Version:
- Use keto-friendly cereal like Catalina Crunch.
- Replace powdered sugar with powdered erythritol or monk fruit sweetener.
- Use sugar-free chocolate chips (Lily’s is a great option).
Peanut-Free Classroom Treat Tip: If you’re making this for school, peanut butter can be a no-go. Swap in cookie butter or Nutella for a crowd-pleasing twist.
Substituting ingredients doesn’t mean sacrificing flavor—you just make it your own.
Discover great ideas like this in our Earl Grey Cookies recipe, another unique and flexible treat.
Step-by-Step Muddy Buddies Recipe
Preparing the Base: Cereal and Coating
Making Muddy Buddies from scratch is fast, fun, and mess-friendly when done right. Here’s how to prep your base in less than 15 minutes.
1. Measure Your Cereal
Start with 9 cups of Chex cereal—rice or corn work best. Pour them into a large mixing bowl. You want something deep enough for stirring without spilling.
2. Melt the Coating
In a microwave-safe bowl, combine:
- 1 cup semisweet chocolate chips
- ½ cup creamy peanut butter
- ¼ cup unsalted butter
Microwave the mixture for 30-second intervals, stirring after each one until it’s completely smooth and glossy. This usually takes 1 to 1.5 minutes total. Then, stir in 1 teaspoon of vanilla extract.
Pro Tip: Don’t overheat the chocolate or it can seize (turn grainy and unusable). Stir often!
3. Combine the Cereal and Coating
Pour the melted mixture over the cereal and stir gently with a spatula until all pieces are evenly coated. Be careful not to crush the cereal—you want each square fully coated but still crunchy.
Looking for inspiration? Try our Pumpkin Banana Loaf if you’re in the mood for other comforting snacks alongside your Muddy Buddies.
Coating and Mixing Techniques for Even Flavor
4. Shake with Powdered Sugar
Transfer the coated cereal into a large gallon-sized resealable plastic bag. Add 1½ cups powdered sugar, seal the bag, and shake it like crazy! (This is a great job for kids.)
Shake until every piece is completely covered in white sugary goodness. You shouldn’t see any gooey or chocolatey parts when you’re done.
5. Cool and Store
Spread the mix out on a baking sheet lined with parchment paper. Let it cool and dry for 15–20 minutes before transferring to an airtight container.
Pro Tip: For ultra-crunchy Muddy Buddies, let them air dry longer before storing. If you bag them while they’re still warm, they can turn soggy.
Optional Add-ins:
- Mini pretzels
- M&Ms
- Chopped peanuts
- Crushed peppermint
- Sprinkles for holidays
With these steps, you’re guaranteed a snack that’s perfectly coated, sweet, and satisfyingly crisp.
Flavor Variations to Try
One of the best things about Muddy Buddies is how customizable they are. You can start with the classic recipe and take it in dozens of directions to match your taste, the season, or a special event. Below are some of the most crave-worthy flavor variations to try at home.
Popular Flavor Twists: Nutella, White Chocolate, Caramel
Nutella Muddy Buddies
Swap peanut butter for Nutella and use milk chocolate chips instead of semisweet. The result? A rich, hazelnut-chocolate dream.
White Chocolate & Cookies ‘n Cream
Use white chocolate chips and add crushed chocolate sandwich cookies to the powdered sugar mix. This combo gives Oreo vibes with a creamy twist.
Salted Caramel Muddy Buddies
Melt caramel bits or caramel sauce into the mix and add a pinch of sea salt after shaking. It’s like gourmet popcorn but crispier and better.
Peanut Butter Cup Version
Use peanut butter chips + chocolate chips together, then toss in chopped mini Reese’s Cups after coating. It’s dessert on dessert.
Don’t miss our easy homemade cookie gift ideas if you’re experimenting with creative twists like these!
Seasonal Flavors: Pumpkin Spice, Peppermint, and More
Seasonal spins on Muddy Buddies are perfect for parties and themed gatherings. Here are our go-to favorites:
| Seasonal Flavor | Key Ingredients |
|---|---|
| Pumpkin Spice | Add pumpkin pie spice + cinnamon + vanilla chips |
| Peppermint Chocolate | Crushed candy canes + mint extract + dark chocolate |
| S’mores | Add mini marshmallows + graham cereal + milk chocolate |
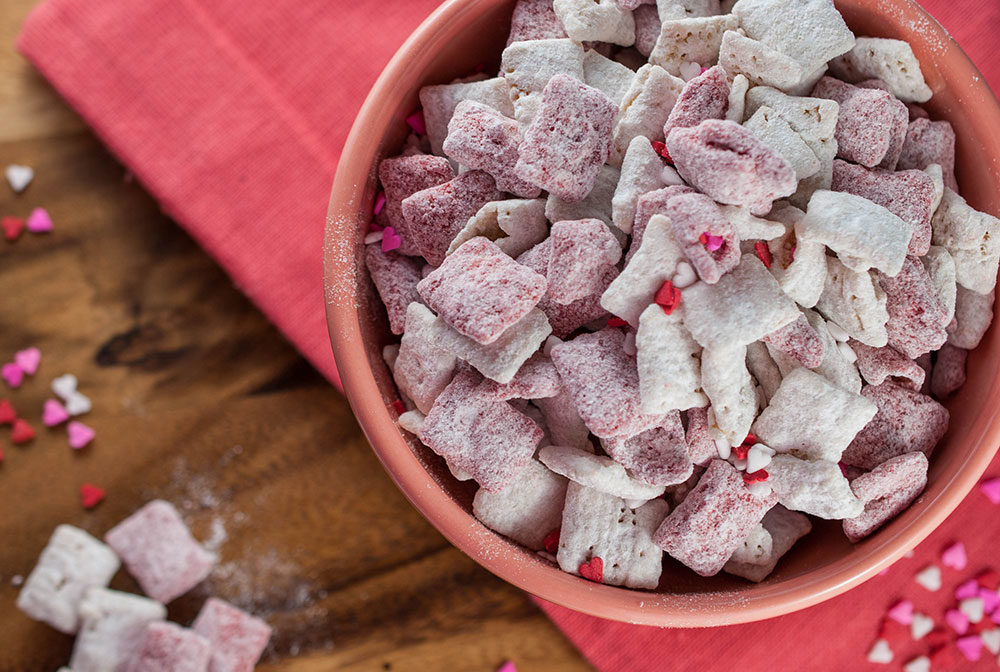
| Valentine’s Day | Strawberry cake mix + pink candy melts + heart sprinkles |
| Easter Bunny Mix | Pastel M&Ms + white chocolate + rainbow sprinkles |
Pro Tip: Match the add-ins to your theme—colored sprinkles, seasonal candies, or shaped cereal work great.
Whether you’re whipping up a batch for Halloween or just treating yourself, seasonal flavors add an extra “wow” to an already awesome snack.