Delicious No Bake Cake Pops: Easy Summer Treats!
|
Getting your Trinity Audio player ready...
|
Last summer, my youngest daughter came home from a birthday party absolutely raving about the cake pops she’d eaten. For the next week, she begged me to make them at home. The only problem?
It was sweltering outside, and the thought of turning on my oven made me cringe. That’s when I discovered the magic of no bake cake pops. I experimented in the kitchen while both girls watched eagerly, and together we created the most delicious treats without heating up the house.
Mateo even joined us, adding his chef’s touch to the decorating process. Now, these no bake cake pops have become our go-to dessert for everything from casual weeknight treats to special celebrations. They’re fun to make, require minimal effort, and the results always impress.
Why You’ll Love These No Bake Cake Pops
These no bake cake pops have completely transformed how we approach dessert in our household. First and foremost, you don’t need an oven, which makes them perfect for hot summer days or when you’re short on time. Additionally, the recipe comes together quickly, usually in under 30 minutes of active preparation time.
Furthermore, kids absolutely adore making these treats. My 15-year-old has made no bake cake pops with her friends at least a dozen times now. The hands-on nature of rolling and decorating allows everyone to get creative.
Moreover, these cake pops are incredibly customizable. You can match any party theme, holiday, or flavor preference with simple adjustments.
Another reason to love this recipe is its foolproof nature. Unlike traditional baked cake pops that require perfect cake texture and precise baking, these no bake cake pops are forgiving. Even if you’re new to making desserts, you’ll achieve beautiful results. Mateo always says that the best recipes are the ones that let you relax and enjoy the process, and these definitely fit that description.
Ingredients You’ll Need
The beauty of no bake cake pops lies in their simple ingredient list. You probably have most of these items in your pantry already. Here’s everything you need to create these delightful treats:
| Ingredient | Quantity |
|---|---|
| Vanilla sandwich cookies (like Oreos) | 24 cookies (about 2 cups crushed) |
| Cream cheese, softened | 4 ounces |
| Chocolate melting wafers or candy melts | 12 ounces |
| Lollipop sticks | 20-24 sticks |
| Sprinkles or decorations | As desired |
| Vanilla extract (optional) | 1 teaspoon |
These basic ingredients create the foundation for delicious no bake cake pops. However, feel free to get creative with different cookie flavors and coating options.
Substitutions & Variations
One aspect I love about no bake cake pops is how easily you can adapt them. My daughters and I have tried countless variations over the months. Here are our favorite substitutions:
Cookie Base Variations: Instead of vanilla sandwich cookies, try chocolate sandwich cookies for a richer flavor. Graham crackers mixed with a bit of honey create a s’mores-inspired version. Alternatively, use vanilla wafers for a lighter, more delicate taste.
Binding Options: While cream cheese works wonderfully, you can substitute it with mascarpone for a slightly sweeter version. Greek yogurt offers a tangier, lighter option. Nut butters like almond or peanut butter add protein and create an entirely different flavor profile.
Coating Choices: Beyond traditional chocolate melts, try white chocolate, dark chocolate, or colored candy melts. Mateo even experimented with coating our no bake cake pops in melted peanut butter chips, which was absolutely incredible.
Flavor Additions: Mix in a tablespoon of cocoa powder for extra chocolate intensity. Add peppermint extract during the holidays. Incorporate lemon zest for a refreshing citrus twist. The possibilities are truly endless.
Step-by-Step Instructions
Making no bake cake pops is straightforward and enjoyable. I’ll walk you through each step just as I do with my daughters when we make them together.
Step 1: Prepare the Cookie Mixture
First, place your sandwich cookies in a food processor. Pulse until they become fine crumbs. Alternatively, place them in a sealed plastic bag and crush them with a rolling pin.
This method works perfectly when my girls want to help. Transfer the crumbs to a large mixing bowl.
Step 2: Add the Binding Agent
Next, add the softened cream cheese to your cookie crumbs. If using vanilla extract, add it now. Mix everything together with a spoon or your hands until the mixture holds together when squeezed.
The texture should resemble wet sand. This is the foundation of your no bake cake pops.
Step 3: Form the Balls
Now comes the fun part. Scoop about one tablespoon of the mixture and roll it between your palms to create smooth balls. Place each ball on a parchment-lined baking sheet.
We typically get 20-24 no bake cake pops from one batch. Once all balls are formed, refrigerate them for at least 30 minutes. This chilling time is crucial.
Step 4: Melt the Coating
While your cake balls chill, melt your chocolate or candy melts. I prefer using the microwave in 30-second intervals, stirring between each interval. Alternatively, use a double boiler for more controlled melting. The coating should be smooth and fluid.
Step 5: Attach the Sticks
Remove your chilled balls from the refrigerator. Dip the tip of a lollipop stick into the melted coating, then insert it halfway into a cake ball. This creates a secure bond. Repeat with all balls, then return them to the refrigerator for 10 minutes.
Step 6: Coat the Cake Pops
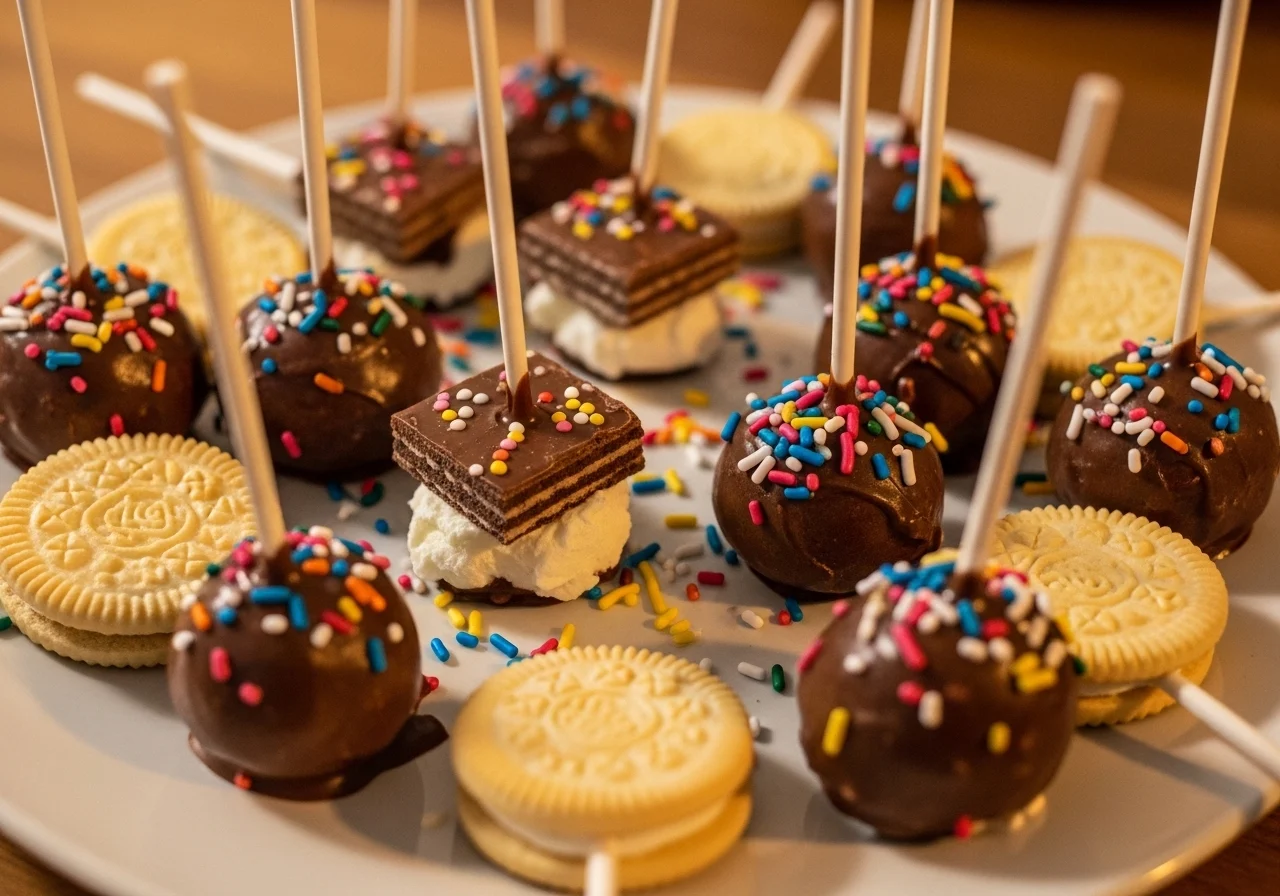
Finally, dip each chilled pop into the melted coating. Hold it over the bowl and gently tap your wrist to remove excess coating. Immediately add sprinkles or decorations while the coating is still wet. Stand the finished no bake cake pops upright in a styrofoam block or lay them on parchment paper to set.
Pro Tips for Success
After making countless batches of no bake cake pops, I’ve learned several tricks that guarantee success every time.
Temperature Matters: Always work with properly chilled cake balls. Warm balls will fall apart when dipping. If your kitchen is particularly warm, chill them longer. Conversely, ensure your coating isn’t too hot, which can cause cracking.
Consistency Check: Your cookie-cream cheese mixture shouldn’t be too wet or too dry. If it’s crumbly and won’t hold together, add more cream cheese by the teaspoon. If it’s too sticky, add more cookie crumbs gradually.
Smooth Coating Technique: Mateo taught me this professional trick: after dipping your no bake cake pops, rotate them slowly while holding them upside down for a few seconds. This prevents drips and creates a perfectly smooth finish.
Decoration Timing: Apply sprinkles, drizzles, or other decorations immediately after coating. Once the chocolate sets, decorations won’t stick properly. Work quickly but carefully.
Storage Between Steps: Don’t skip the refrigeration steps. Each chilling period ensures your no bake cake pops hold their shape and have the perfect texture.
Storage & Reheating Tips
Proper storage keeps your no bake cake pops fresh and delicious for days. I’ll share exactly how we store ours at home.
Short-Term Storage: Keep finished no bake cake pops in an airtight container in the refrigerator. They’ll stay fresh for up to one week. Layer them carefully with parchment paper between layers to prevent sticking.
Room Temperature: If you prefer softer cake pops, you can leave them at room temperature for up to three days. However, ensure they’re in a cool, dry place away from direct sunlight.
Freezing Instructions: These no bake cake pops freeze beautifully. Place them in a single layer on a baking sheet and freeze until solid. Then transfer to a freezer-safe container or bag.
They’ll keep for up to three months. Thaw in the refrigerator overnight before serving.
Serving Temperature: We actually prefer eating our no bake cake pops slightly chilled, straight from the refrigerator. However, letting them sit at room temperature for 10-15 minutes creates a softer, creamier texture.
What to Serve With This Recipe
While no bake cake pops are absolutely delicious on their own, pairing them with complementary items creates a complete dessert experience.
Beverage Pairings: Serve these treats alongside cold milk, which is my daughters’ favorite combination. Hot chocolate makes them perfect for winter gatherings. Coffee or espresso balances the sweetness beautifully for adult parties. Fresh lemonade offers a refreshing contrast during summer celebrations.
Dessert Tables: Include no bake cake pops as part of a larger dessert spread. They pair wonderfully with cookies, brownies, and fruit platters. Their vertical presentation adds visual interest to any table.
Ice Cream Companion: Mateo loves serving these alongside homemade ice cream. The temperature contrast and complementary flavors create an restaurant-quality dessert at home.
Party Presentations: For birthdays or celebrations, display your no bake cake pops in decorative arrangements. Surround them with fresh berries, mint leaves, or edible flowers for an elegant touch.
FAQs
Can I make no bake cake pops ahead of time?
Absolutely! In fact, no bake cake pops are perfect for advance preparation. Make them up to three days before your event and store them in the refrigerator.
For longer storage, freeze them as described above. This make-ahead quality makes them ideal for busy schedules.
Why are my cake pops falling off the sticks?
This common problem usually happens when the cake balls aren’t properly chilled before dipping. Always refrigerate your formed balls for at least 30 minutes. Additionally, ensure you dip the stick in melted coating before inserting it.
This creates a strong bond. Finally, don’t use coating that’s too hot, as it can melt the cake ball.
How do I prevent cracks in the coating?
Cracks typically occur due to temperature differences. Make sure your cake balls are cold but not frozen solid. Let them sit at room temperature for just 2-3 minutes before dipping.
Also, ensure your melted coating isn’t excessively hot. If cracks still appear, try adding a teaspoon of vegetable oil to your melted coating to make it more pliable.
Can I use homemade cake instead of cookies?
While traditional cake pops use baked cake, these no bake cake pops specifically use cookies for convenience. However, you could experiment with store-bought pound cake or angel food cake crumbled and mixed with cream cheese. The texture will differ slightly, but it can work. Just ensure the mixture holds together properly.
What’s the best way to display cake pops at a party?
We love using styrofoam blocks covered with decorative paper or fabric. Alternatively, fill a tall vase with candy or decorative stones and insert the sticks. Tiered cake pop stands are available online and create beautiful presentations.
For casual gatherings, simply arrange them on a pretty platter. The no bake cake pops themselves are so attractive that simple presentations work wonderfully.
Nutrition Information (per serving)
Based on a recipe yielding 24 cake pops, here’s the approximate nutritional breakdown for one no bake cake pop:
| Nutrient | Amount Per Serving |
|---|---|
| Calories | 145 |
| Total Fat | 7g |
| Saturated Fat | 3.5g |
| Cholesterol | 5mg |
| Sodium | 95mg |
| Total Carbohydrates | 19g |
| Dietary Fiber | 0.5g |
| Sugars | 13g |
| Protein | 1.5g |
These no bake cake pops are treats meant for enjoyment rather than everyday nutrition. However, their portion-controlled nature helps with mindful indulgence. As Mateo always reminds us, food is love, and sometimes love comes in the form of a beautifully decorated, delicious little dessert that brings smiles to everyone’s faces.
No bake cake pops
Ingredients
Method
- Prepare the Cookie Mixture: Crush the sandwich cookies in a food processor or plastic bag until fine crumbs. Transfer to a large mixing bowl.
- Add the Binding Agent: Mix softened cream cheese and optional vanilla extract into the cookie crumbs until the mixture holds together.
- Form the Balls: Roll about one tablespoon of the mixture into smooth balls and place on a parchment-lined baking sheet. Refrigerate for at least 30 minutes.
- Melt the Coating: Melt chocolate or candy melts in the microwave or double boiler until smooth.
- Attach the Sticks: Dip the tip of a lollipop stick into the melted coating and insert it halfway into each cake ball. Refrigerate for 10 minutes.
- Coat the Cake Pops: Dip each chilled pop into the melted coating, tap to remove excess, and add sprinkles while still wet. Let them set upright.
Notes
Or browse by category:
As an Amazon Associate I earn from qualifying purchases.